Dataverse for Teams is an exciting development platform that lets you get apps quickly into your user’s hands, and surfaced directly where they are doing most of their collaboration – inside the Microsoft Teams client.
Dataverse for Teams is a subset of standalone Dataverse in the Power Platform, and while it has many of the main characteristics of Dataverse, there are some features that are scaled back or simplified, especially with regards to advanced security configurations. The inability to create custom Security Roles, no Record Sharing capability, and the simplified permission sets available (Full Control, Collaborate, Reference, Private, None) make it harder to create custom roles and permission levels that don’t directly correspond to the Owners/Members/Guests hierarchy. For example, maybe you want to expose table data to your external partners who you invite to your Teams as external Guest users, and you want each partner organization to view their own organization’s records but not see or edit records from other organizations. The simplified permissions in Dataverse for Teams make it difficult to achieve this, as all the users will be treated as “Guests” collectively and assigned the same permission levels that all Guests are assigned to the tables, and you don’t have a mechanism to further group these users beyond Owners/Members/Guests. This post will show you a creative way to achieve this using record ownership instead of custom security roles.
The quick summary – you can create custom “Teams” in Dataverse for Teams (just like in standalone), and assign record ownership to a Team instead of an individual user, and thereby create another hierarchical layer of permissions. Read on to understand the backstory more, or jump ahead to see how to do it.
Overview of Dataverse Security and Permissions
Before getting started, take some time to review the official documentation for how security works in Dataverse, I’ve highlighted some key links below:
- Security in Microsoft Dataverse
- Security Concepts in Microsoft Dataverse
- Security Roles and Privileges
- Compare Dataverse and Dataverse for Teams
At the core of standalone Dataverse is a hierarchical role-based permissioning system where you can define named Roles, assign users to those Roles, and then assign specific permissions to Dataverse resources (Tables, Rows in those Tables, and even Columns) to those Roles. These objects are actually stored in Dataverse tables, with many to many relationships between these objects. A crude representation of this is below:
- [Users] <-> [Security Roles] <-> [Privileges] <-> [Resource]
There is even a concept of a grouping mechanism, to which you can assign users, and then assign that group to the Security Role. This custom group is called a “Team” in Dataverse, and lives in a table called “Teams”. So we can update the mapping above to show that you can either assign users directly to roles, or assign them to a Team, and then assign the Team to a role:
- [Users] <-> [Security Roles] <-> [Privileges] <-> [Resource]
- [Users] <-> [Teams] <-> [Security Roles] <-> [Privileges] <-> [Resource]
If you are familiar with SharePoint and SharePoint permissions, this ad-hoc group is very similar to a SharePoint Group. You can create these groups (Teams) yourself, and you can either add users individually to them, or link them to Azure AD Security Groups or M365 Groups (these are called “Group Teams“).
Here is where it gets confusing, and where the nomenclature is going to bite me, so I’ll try and lay out the terminology I’ll use for the rest of this post to hopefully avoid confusion.
“Microsoft Teams” Team – This is a Team created in the Microsoft Teams client, that is used for collaboration. It has Owners, Members, and Guests roles, and has channels and tabs for chat and access to Teams related apps.
“Dataverse” Team – This is a record inside of a Dataverse database table called “Teams”. This record represents a custom or built-in group that you can leverage for permissions. Official doc links for this:
Dataverse for Teams (DVFT) – A dedicated Power Platform environment and Dataverse database for a specific “Microsoft Teams” Team, in which you can store data, Power Apps, Power Automate workflows, and Power Virtual Agent chatbots. This environment/database is linked to it’s “Microsoft Teams” Team lifecycle – it is created when the first Power Platform asset is created within the “Microsoft Teams” Team, and deleted when the linked “Microsoft Teams” Team is deleted.
The Problem
If you look at the detailed comparison on security between Dataverse for Teams (DVFT) and standalone Dataverse, you’ll see a number of differences, most importantly:
- No Record Sharing
- No hierarchical security
- Cannot create custom User Roles, and are limited to the default Teams Owners/Members/Guests roles (we call this the OMG pattern)
- Are limited to just one Business Unit (means you can’t create an organizational hierarchy structure for permissioning)
These differences, combined with a limited set of privilege levels makes it very hard to create customized roles and groups within your DVFT applications for more advanced security implementations.
The default privilege levels in DVFT are as follows:
- Full access – Allows end users to see and edit all records in the table.
- Collaborate – Allows end users to see all records, but they can only edit their own records.
- Reference – Provides a read-only view of data for end users.
- Private – Allows end users to only view and edit their own data.
What a lot of my customers are looking for is a way to create custom groups of users within DVFT, assign users to those groups, and let anyone in a particular group see just the records for that group, and not other groups. With the privilege levels above, Collaborate, Reference, and Private would not work because those would either give read access to all records, or give Read/Edit access to only records directly owned (created) by the individual user.
To accomplish these requirements, it would seem that we need to give all guest users Full Access permissions, and just filter what they see and access in the UI using Filter() formulas and PowerFx logic. But this is certainly error-prone, and if a developer in the future forgets to filter some data properly, then data could be leaked across organizations/roles.
What we need is a way to create custom groups and have the group own the record, so that true security trimming is in place, not just filtering. This is where custom “Dataverse” Teams and record ownership come in.
The Solution – Custom “Dataverse” Teams and Record Ownership
Now, for what I am going to show you next, there is no pre-built, pretty user interface for managing “Dataverse” Teams and changing record ownership, but the capabilities are all there to do this from Power Apps or Power Automate workflows that you build in DVFT.
To start with, I’m going to walk through how to create a custom “Dataverse” Team. Since these are stored in a table called Teams, I’m just going to create a new Power App in DVFT, and add the Teams table as a Data Source (Start this screen… with data).
Here I am creating a new app and naming it:

When the app loads up, I’ll choose the first option to Start this screen … With data:

When asked to Select a data source, I’ll type Teams in the search box and choose the Teams table:

Once the screen is created, you’ll see that you are browsing the records in the Teams table directly. One potentially confusing thing is your Datasource will get named “Teams_1” in the app. This is so that it doesn’t collide with the Teams Integration control that is added to every DVFT Power App which is already named “Teams”. In Power Apps every control needs a unique name.


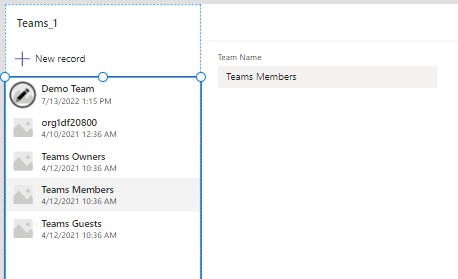
On the newly created screen you’ll see a few default teams in the gallery there. The one that is named the same as your “Microsoft Teams” Team is for Collegues with Access when you share your Power App with other collegues. The Team with the orgXYZ prefix is the single Business Unit you are allocated in DVFT (you aren’t allowed to create additional business units). And you’ll also see Teams Owners, Teams Members, and Teams Guests. These last 3 are “Group Teams”, linked to the Azure AD M365 group that backs your “Microsoft Teams” Team.

To see some more details about the groups, I will edit the EditForm control to show a few additional fields about the selected Team, including “Team Type” and “Membership Type”:

Now that I’ve added those fields, we can see the Team Type is AAD Office Group, and the Membership Type is one of either Owners, Members, Guests, or Members and Guests.

To create a custom team, the only required fields are these three – Team Name, Team Type, and Membership Type. I’ll just use the New record button to create a new team called Contoso, and another called Fabrikam. For Team Type, you need to choose “Owner”, and for Membership Type I am going to choose “Members and Guests” (no matter what you set it to, the only option that will save is “Members and Guests”). You can see my newly created “Dataverse” Teams below:

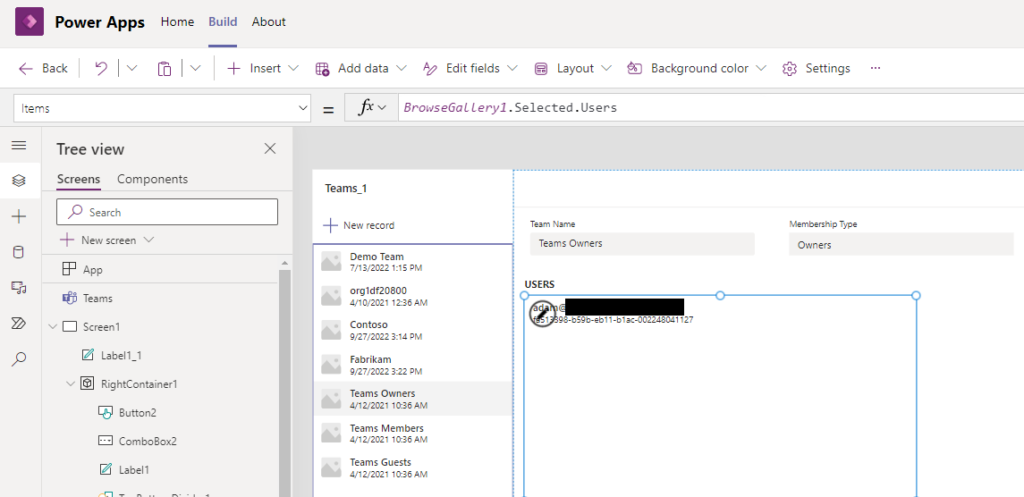
Now that I have some Teams created, I am going to assign users from the Users table to the Team. This can easily be done using the Relate/Unrelate Power Apps functions (or the Relate/Unrelate a Record actions in Power Automate). Users to Teams table relationship is Many-To-Many, so you can’t use Patch or EditForm to set this. To accomplish this, I am going to add a gallery underneath the current EditForm control to display related Users to the selected Team, and then a ComboBox and Button to select users and Relate them to the team. I’ll also add a Delete button on the gallery to Unrelate. The Items property of the new gallery will just traverse the relationship from the selected Team in the main left gallery:
|
1 |
BrowseGallery1.Selected.Users |

For the ComboBox, I am going to set the Items property to the Users table in Dataverse, and Allow Searching:

For the button, I’ll use the following formula for OnSelect:
|
1 |
Relate(BrowseGallery1.Selected.Users, ComboBox2.Selected) |
And lastly, for the delete button in the gallery, I’ll use the following formula to Unrelate the record:
|
1 |
Select(Parent);Unrelate(BrowseGallery1.Selected.Users,ThisItem) |
You can see in the picture below the user that has been related to the selected Contoso team:

You can make this UI more advanced and user friendly, but for now I’m keeping it simple to demonstrate the concept.
Now that I’ve created a custom Team and assigned a user to it, there is one final thing that needs to be done before changing record ownership to the Team. In order to assign a “Dataverse” Team as the owner of a record, it must have Read permissions to the table (it would make no sense to assign an Owner that couldn’t even read the record). Right now, my newly created group does not have any explicit or implicit permissions to any of the tables in Dataverse. To give it access, I will relate the “Dataverse” Team to one of the pre-existing Security Roles, namely “Teams Guest”. Each DVFT environment comes with several pre-existing Security Roles, including “Teams Owner”, “Teams Member”, and “Teams Guest”. When you assign Table permissions within the DVFT UI, you are actually assigning one of these 3 security roles one of the privilege levels to the table. The UI filters out all the other system-generated roles like sysadmin, system customizer, etc. Those roles are there, but you are not allowed to create additional roles or see these other roles in the UI.
To accomplish this, I will create another screen in my application to browse the Security Roles, and a similar Gallery/ComboBox implementation to browse related Teams and relate a team to the role. I’ll choose to create a New Screen > Blank Screen > Start with Data > and choose the Security Roles Table.
For my new gallery Items property I will set it to:
|
1 |
BrowseGallery2.Selected.Teams |
And for my ComboBox, the Datasource (Items Property) will be set to “Teams_1” and I will allow searching. For the Add Team button, I will use a similar Relate formula:
|
1 |
Relate(BrowseGallery2.Selected.Teams, ComboBox3.Selected) |
Here I am showing the newly related Contoso Team:

Changing Record Ownership
Now that I have a custom Team record in place, a user associated to the Team, and I’ve given the Team a security role, I can now assign records to have the Team as an owner instead of the original Created By user.
If you are unfamiliar with record ownership in Dataverse, every table in Dataverse has a column named Owner. This column can store a reference to either a User or a Team or even a Business Unit. Usually the Owner is set to the original creator of the row (the person listed in the Created By column), but it can be changed, and set to a different user, or also to a “Dataverse” Team.
To set the Owner field in Canvas Apps, you need to use a Patch() formula (see this great article for more details), as the EditForm control locks the Owner field from editing.
UPDATE 11/2/2022: Actually, you don’t have to use the Patch formula, you can also set the Owner field from an EditForm control. Add the field Owner to the EditForm control. It will add an empty DataCard to your form. To update the ownership, set the Update property of the DataCard to the “Dataverse” Team record that you want to be the owner of the record, for example Lookup(Teams_1, ‘Team Name’=”MyTeamName”). In this way, you can change ownership directly to the team at time of record creation (FormMode.New) or during update (FormMode.Edit).
To demonstrate this, I am going to create another blank screen, and this time start from a new table. I’ll create a a table called “Discount Codes“. In this scenario, I am inviting my Resellers to come into my app and create trackable discount codes for use when reselling my products. I only want users to see their own organization’s discount codes, not any others.
I’ll create the custom table “Discount Codes” with two fields, Name (Text), and Expiration Date (Date). I’ll also add the Owner column in the default view so that we can see the values there.


Once done editing the table, back on the canvas app screen I’m also going to change the EditForm control so it displays Owning User, Owning Team, and Owning Business Unit values, just so you can see this.

For now, just to prove that I can indeed change ownership, I am going to place a ComboBox and Button in order to manually change ownership to my Contoso or Fabrikam team I created earlier.
The ComboBox Items will be bound to the Teams_1 data source (Teams Table), and the Button’s OnSelect will look like this:
|
1 |
Patch('Discount Codes', BrowseGallery3.Selected, {Owner:ComboBox4.Selected}) |
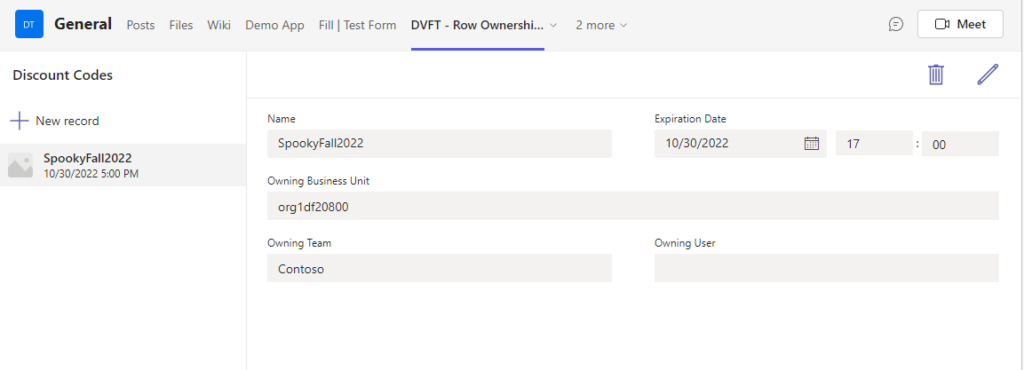
You can see that after I select Contoso from the ComboBox and click the button, that ownership is reset to the Team instead of the individual user (Owning Team is now Contoso, and Owning User is empty):

I’ve gone ahead and assigned one record to Contoso, and the other to Fabrikam.
Now, I’ll move this screen up to the top of the Tree View so it becomes the Start Screen for the application. Before I log on with an external guest account and verify the permissions, I am going to check the Table permissions on my custom Discount Codes table to make sure they are correct. I will save and Publish my app to the General channel in the team first, and then go to the Build tab of the Power Apps App, and open up my table for editing. You can see that on my table, Team Members have Full access, and Guests have Private permissions (which means an external guest should only be able to see and edit their own rows.

Now I will login to the Team as an external user that is a member of the Contoso custom Team I created, and I should only see SpookyFall2022 discount code, which is indeed what I see:

The great part about this is I am now relying on actual security to trim the rows, as opposed to a developer just filtering things via queries. It is now impossible for a user who is associated with one “Dataverse” Team, to see records owned by other Teams (or other Users) as long as ownership is setup properly.
Summary and Closing Thoughts
In this post I’ve shown how you can create custom “Dataverse” Team records, associate users to those teams, and then assign record ownership to the custom teams in order to get advanced layers of security in your Dataverse for Teams apps, instead of granting overly broad permissions and relying on crude filtering for security.
Using this approach, you will still need to manage the process of changing record ownership yourself. Records created will always be assigned ownership to the original user that created the record by default. But you can do this with additional formulas that execute after Patch() or SubmitForm() statements, or you can even automate this by creating a Power Automate workflow triggered when Rows are Added to the table, that does the reassignment automatically. Even if the reassignment fails temporarily, the worst that will happen is the record will only be visible to the creator instead of to the broader members of the custom “Dataverse” Team, so no data will be leaked.
If you like this approach or have comments or questions on it, please leave a comment in the thread below. Thanks for reading!


